Showing posts with label custom invitations. Show all posts

Butterfly Baby Shower {Huntington Beach Stationery Designer}


Adrienne attended a surprise bridal shower this weekend that was beyond adorable. The hostess decorated with super cute butterflies and beautiful flower arrangements. The soft and dark pinks and greens were gorgeous against a cream back drop. And we loved the butterfly confetti strewn about. Definitely a great way to use up those extra scraps of paper!

Checkerboard {Ideas and Information}

CB_Logo

Inspired by a desire for a fresh approach to invitations, the Checkerboard collection offers ornate and luxurious designs. With over 10 albums, Checkerboard offers invitations, announcements, and stationery for just about every occasion and event under the sun—themed parties, showers, graduations, births, moving, wedding, Bar and Bat Mitzvahs and more.

Luminesce Suite

Checkerboard's Luminesce invitation was highlighted on Good Morning America during a segment on the influence of the royal wedding on upcoming events. Millie Martini Bratten, editor in chief of BRIDES magazine, spoke to this trend and displayed this stunning design during the interview. Click on this link to view the GMA segment.

You can browse through the Checkerboard collection online through Cherish Paperie's website. Contact us if you have any questions or need help ordering this product.


Custom Invitation Maps & Direction Cards {Ideas and Information}

When designing your invitation you main focus is to provide the details of your special day to your guests. A great way to help guests is to provide a map with your invitation information showing them where they are supposed to be and where they might be going.

Some guests may be from out of town or are unfamiliar with your wedding venue. By providing a map and directions on how to get there from different points of the city or county you can be assured that the chance of a guest being late due to getting lost or having incorrect directions is reduced.

If you are getting married at a place that is not right next to the location of your reception you can use a map to give step by step directions to your reception location. This will help guests not only find their way to the party but will also give them a way to plan the timing of leaving the wedding location and arriving at the reception location.

When thinking about designs for your map remember a few simple tips.

Less is more
Try to make your map as simple and clean looking as possible. You want to get your guest to their destination, not side track them with extra details and locations.

Include the important information
Try not to forget to put the address(es) on the map. It's helpful to put the address of the destination in a prominent place so guests can use other mapping tools, like GPS, to get to the destination.

Add a direction card
Including written directions on either the front or back of the map is something that should not be forgotten. Writing directions from the north, south, east and west is very helpful but if you think people will be able to get there by only giving two directions then feel free to do so.

Use simple fonts
A clear, easy to read font should be used on the direction cards. Sometimes more intricate fonts can be hard to read. You can use those pretty fonts for your names and the date if you want to use them. It's always fun to use the same fonts you've used on your wedding invitations. That way the map and direction card have a similar feel to the invitation itself.

If you want to try and design your invitations on your own, we've found a great DIY tutorial for you over on Wedding Bee's blog. It's actually very similar to the tutorial I used for my wedding map. Then simply send them to us with your invitation order and we'll print them up for you! Or if you don't have time to create a map yourself have us design it for you for a small fee.


Featured Tiffany Blue Invitation {Newport Beach Wedding Invitation Designer}


This Tiffany Blue invitation is a fun cute way to share your wedding colors with your guests before the big day. And did you notice the ribbon added to the invitation that wraps around the back into a bow? Perfect for the style of this design.


If you like the look of this invitation and want to start personalizing your own please contact Cherish Paperie and reference our Tiffany Blue invitation pictured above. We'd love to work with you to design the perfect invitation for your event!

Vintage Rose {Featured Invitation}


Love this vintage rose invitation and program combo! The colors seem perfect for a fall wedding and I really like how the invitation and the program are coordinating. Tying in the invitation to the ceremony and reception decor is always a great touch.

The Importance of Proofreading {Ideas & Information}

So you've created the perfect custom invitation and are ready to tell us to send it to the press. Before signing off on your custom invitation we highly suggest going over your final proof with a fine tooth comb. Proofreading your invitation could mean the difference between having your friends and family show up at your wedding location and having them show up two counties over.

While proofreading is a seemingly simple task, it can prove to be a challenge not because you don't know the information, etiquette, etc. but because you have had your head immersed in the design and proofs of the invitation (and the wedding!) from the beginning. Plus, your invitation designer might not personally know the names of those involved and the locations of your events meaning that they can't know if an address or name is incorrect. 

Below are a few great tips and tricks to proofreading your invitation before giving the go-ahead to start production:

Read through your invitation slowly
  • go to a quiet place away from friends and family
  • make sure there are no distractions around - turn off the tv, cell phone, radio
  • once you've read the invitation top to bottom, reverse yourself and go from the bottom to top
  • put the invitation away and take a break, come back to the invitation a few hours later
Enlist the help of others
  • have your fiance read through the invitation
  • have your mother or mother-in-law read through the invitation
  • have your boss read through the invitation
  • have your next door neighbor read through the invitation
  • make sure those who are directly and indirectly involved in the wedding help
  • do not stand over the person proofing your invitation
Read through your changes
  • check to make sure you aren't making the same mistake twice
  • see if what you are changing reads correctly, type it out and re-read it to make sure
  • if needed, re-type out the invitation sentence by sentence to double check what you've requested
Go through the checklist
  • Spelling of ALL names - including yours
  • Check all dates - Wedding date & year, RSVP date
  • Spelling of ALL locations and venues
  • Verify all addresses and check driving directions
  • Check spacing between words and sentences 
  • Verify monograms, stamps, etc 
  • Check shape and size including font shape and size
  • Check general colors to make sure that your computer monitor isn't changing anything
Request a final proof in a sample
  • To really verify that the look and feel of your invitation is correct ask for a sample mock up of the invitation
  • Re-review each of these steps once you receive this proof


Save the Date {Custom Wedding Stationery}

The date is set and you're ready to let friends and family know what date to save. Why not do it with a Save the Date? If you're having a destination wedding, have a wedding date on a three-day holiday weekend or have a lot of out of town guests you plan on inviting you may want to send out save the dates to your guests.

There are many options on how to send out your save the dates. You can go simple with a post card or an email, or you can go with a more unique way. I sent out save the date stickers and placed them like a business card on my printed save the date card. That way guests could either put the save the date on the fridge or use the sticker on their calendar.

I love the look of this "photo booth" save the date. It seems so personable and memorable. And using your own picture whether its from an engagement photo shoot or taken by a friend (or photo booth) takes a save the date from formal to more casual. And the simplicity of the design is just perfect!


But there's nothing wrong with formal! Or matching your save the dates with all of the other stationery for your wedding. Why not use a save the date that compliments the invitations you are choosing? And while you're at it you can design the reception stationery for your special day all at the same time. This can save you time and energy later on in the planning process. One less thing to check off your list.

This feathered card is simple and elegant. It includes all of the important information and clearly highlights what date your event will take place on and the location of the event. 

And since a save the date is getting the word out on what date your wedding will take place, a save the date that highlights that date as part of the design might be a great choice for you.

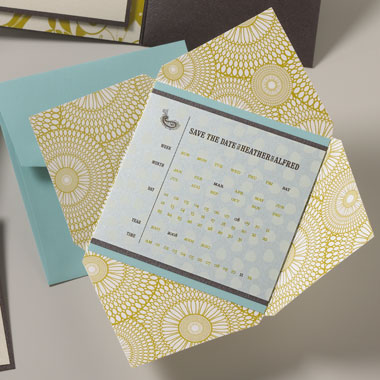
These next two save the dates feature calendars right on the front of the card. You can get specific and list the day of the week, month, date, year and time or you can just include a picture of a calendar and circle your date.


Tips for Save the Dates: 
  • Include the date of your wedding, your names and the location or city that the wedding will take place  
  • Send out your save the dates 6-12 months in advance
  • You don't need to send a save the date to every guest. If only a handful of your guests will need to make travel arrangements to make it to your wedding you can just order enough to send to them.
  • And remember the most important thing about a save the date - to only send them to people you know you will be inviting. Do not send a save the date to those who aren't on your wedding guest list; if you aren't sure than don't send it. 
  • And remember to have fun! Save the dates are your chance to get creative and have fun. There's no proper etiquette on wording, etc. 

Whimsical Fun - Greens and Browns {Featured Invitation}

I was going to wait and feature these for a future color board but I couldn't help myself... how cute are these invitations?? I love the fun, whimsical feel to it all. And the two cute love birds in the tree? Adorable! I also like the swirls in the tree branches that almost make hearts the way they're positioned. Don't you just love it?


I can't wait to see what the wedding is like!

Let the 2011 Inspiration begin....with new paper colors! {Inspiration & Ideas}


So excited to announce the unveiling of two new colors from Envelopments®!

Soleil: a bright yellow that goes great with our patterned stocks and like its namesake (the sun) Soleil is filled with light and warmth, it conjures up images of sunflowers, beach balls, tropical locations and summer celebrations

Limoncello: looks just like the Italian liqueur it is named for, it calls to mind wild spring flowers, daffodils, margaritas and coordinates very nicely in the palette with Napa, Wicked and Mystic to name a few.


If you're interested in using these new colors as your next invitation inspiration contact us to start creating today!

An Invitation Story {San Diego, CA}

By Danielle Simmons

Creating the perfect invitation for my wedding was very important to me. It was the vehicle in which we announced to the world when and where we were tying the knot. I did a lot of research before contacting Adrienne at Custom-Programs. And I knew exactly what I wanted. I had heard that pocket invitations were all the rage and loved the way the "extras" like the RSVP card, Directions & Information looked all nestled in one side of the invitation while the wording stood prominently in the center. And than on the outside of the invitation I was able to customize a logo for our special day. Something I could transfer over from the invitation to the centerpieces to the favors. The theme of my wedding started with that invitation.
Through researching the perfect invitation I found that I not only had to create a pretty piece of stationery, I also had to create the perfect wording. What would go right with the feel of our ceremony? What words would make the guest know exactly what to expect? I spent a lot of time with my friend, Mr. Google. But the problem was that not one article I read just told me exactly what to do. Then I got wind of a person, a screenname actually, on a message board I frequent who actually takes what wording you have and tweaks it for you. And not just to your specifications but also to what is considered "proper etiquette". Ya know, like asking Miss Manners herself. His name was Chad_n_Jared. Yeah, he's no longer in theKnot.com's data base if you're wondering. Sorta sucks cause he was really helpful at the time and told it to you straight.

Not only did I have two sets of parents giving me away, I also had a father in law who was a junior and I was having a full mass. Figuring out what to say where, what to omit and what to include took a bit of time. I wanted to make sure that everyone who deserved recognition was recognized and didn't want to offend anyone.

Once I got the perfect wording I was set. I had my invitation design and colors, I had my wording, now I just had to wait for the invitations to come. And since I was a DIYer to save money I had already rallied the troops (i.e. our family) to come and help assemble when they came in. It really was a group effort and I loved every minute of it. Once everything was assembled it was time for me to hand address the invitations, both the inner and outer envelope to Miss Manner's specifications. Once I saw all of the invitations lined up I felt... accomplished! One more thing off of my LONG to-do list meant I was that much closer to the big day.

I took the invitations to the post office (because how else would I know that the correct postage was selected?) and mailed them off. It was almost like mailing off my babies. I just kept thinking good thoughts for them. Ya know, like "I hope they arrive in good condition" or "I hope that mail sorter thingy doesn't rip the corner". Cause I'm a freak like that. But I didn't feel like that was weird because some of my girlfriends hand canceled their invitations at the post office (not that you're weird for doing this, I just didn't know to ask).

Then a few weeks went by and I started getting the RSVPs back! Boy what that fun. Mail arrived just about every day and it wasn't junk mail! Talk about a great thing to come home to. I had two shoe boxes ready to go for each response. I loved how people would write encouraging comments on the RSVP. I never thought of doing that! Now I do it all the time when I send my own RSVPs in. And after this whole experience I know to send the RSVP right away once I receive the invitation. There were far to many non-responsive people that I had to track down before the wedding and our wedding reception was held on a naval base that required a complete and accurate guest list.

Now that the wedding day has passed (our four year anniversary is coming up in June) the invitation is still a reminder of what a special day we had. I have it framed in the hallway of our house to always remind me of our experience that day as well as the experience of planning our wedding. It truly was an adventure.

Do you have an invitation story to share? Send in your story with pictures to danielle@custom-programs.com for a chance to be featured on our blog!

Our New Look!


You may have already noticed the new logo at the top of this blog...it is a preview of great things to come!

Thanks to our wonderful designer Diane, who has been helping to pull together a more cohesive look for us...the logo is just the start of things to come. We have changed our letterhead, ads, catalog cards, envelopes....everything is getting a face lift!

In a few months we will have our long-awaited new website up and running with better features for shipment tracking and online ordering. We hope you will be as excited as we are about the new changes around the shop!

Custom Stamps

I love it when all the stationery and printed materials for an event coordinate. As I am sure most of you know who have browsed our website - we offer everything from Save the Dates and Invitations to Reception Stationery (placecards and menus) and Thank You notes...

And now....custom stamps as well! So EVERYTHING can coordinate! Let us know what you think of our new gallery on Zazzle, anything can be customized to any colors, and of course let us know if you have any suggestions for new designs.... we love coming up with new things!

FAQ Series - Custom Colors?

We get this same question over and over...."I like xxx on your website...can you do it in another color, font, etc?"

YES! we are CUSTOM programs...so almost everything we do is custom ;-)

The images you see on our site are just examples of work we have done before - anything about them can be changed...colors, fonts, ink, type, graphics, etc. You can like the colors of one image and the graphics from another - we will combine them to make your "perfect" invitation or program! Your imagination is the limit!

LinkWithin

Related Posts Plugin for WordPress, Blogger...