Showing posts with label DIY. Show all posts

Alternatives to the Traditional Guest Book {Ideas and Inspiration}

A few decades back a guest book at a wedding was simply a place where guests signed their names documenting their attendance. Nowadays guest books are a lot more clever and a great way to create a memento from your special day. Here are a few great ideas for different guest books to make your memories stand out. From simple DIY to more intricate ideas, we've got four great ways to make your guest book a keepsake to remember.

Photo Booth
Allow your guests to get creative and have fun with a photo booth. Guests take pictures of themselves with, or without, props and some photo booths even allow guests to write messages to the happy couple. Ask guests to include a copy of their pictures and a note in a photo book you leave on the side of the photo booth. For inspiration check out this real wedding over on Martha Stewart Weddings. 


Source

Thumb Prints
Leave an ink pad and a tree on a large piece of paper and have your guests fill in the leaves with their finger prints. Have them sign on or under their print to have a personalized guest book you can frame and display in your home. You can find pre-made thumb print trees on Etsy if you don't want to create one yourself.


Source

Photo Book 
Turn your engagement photos into a photo book by using one of the many photo processing sites such as Shutterfly, Costco.com, Mpix, etc. Or find a local photo development company to do it for you. Leave room on each page for guests to leave their sentiments. Or get creative and have guests give specific advice about certain things on every few pages. And if you are receiving professional engagements photos from a photographer make sure to ask them if they have any great sources for photo books. Odds are they already work with a company for weddings!

Source

Mini Envelope
We first saw this book over on Emmaline Bride and had to go over and check it out for ourselves. Elegantly Bound has a custom envelope guest book where each guest takes a notecard out of an attached envelope and writes their greeting. They then put it back in the envelope and are done! At the end of your wedding day you can go and look in each envelope to see what everyone has said! How creative is that?

Source

Whatever you decide, your guest book should be an item that you are able to treasure forever!

Heart Shaped Crayon Valentines {DIY Tutorial}


I first saw the crayon heart valentines on the Family Fun website. I thought they looked adorable but didn't have a heart mold so I figured I'd just send the regular store-bought valentines instead since I had a few I purchased on clearance a few years back. Then we went to Target and I saw the heart molds in the dollar section of the store and I couldn't pass up the opportunity. Plus they were all over Pinterest!

So I went to the store, stocked up on a mold and crayons and headed home to do some experimenting. Before I started I did a little research to see what others were saying about the craft. I try not to just jump into a tutorial without reading about it from a few others first. That can lead to disaster (or just make it harder on me since others have found key tips/tricks on making it easier). Once I got the low-down I headed to the kitchen to soak, unwrap, break and bake! And here's what I did:

Materials Needed:
  • 1 box crayons, unwrapped (or left over broken crayons laying around)
  • 1-2 heart molds, choose your size
  • Construction Paper
  • Alphabet stamps OR printer
  • Adhesive dots

What to do: 

Place your crayons in a heat proof dish & preheat oven to 250 degrees.


Heat up some water and pour warm water on crayons (note: do not use boiling water... crayons might melt).


Let crayons soak for 30 seconds (see what happens when your water's too hot?).


Unwrap crayons (any that didn't unwrap easily after soaking were set aside and not used).


Put crayons in a dish and let kids break them up into small, tiny pieces (or put them in a bag and hammer with a kitchen mallet or meat tenderizer until broken up).


Place heart molds on a rimmed baking sheet and fill with broken crayon pieces.


Place tray in oven and bake for 15-18 minutes or until crayons are fully melted. Then carefully take out of oven and set aside to harden.


Once cooled completely pop crayons out of molds and smooth edges by rubbing against a piece of paper.


Now's the fun part! You can decide what you want to do with the crayons once you've baked them. I decided to use scrapbooking paper I already had in the house to create a postcard sized Valentine for my son. You can use this printable here for a square valentine with the writing already on the paper or this printable here for a circle valentine (you just have to add your child's name).

Or you can do what I did and use an alphabet stamp set to customize the sayings you put on each valentine. I simply adhered the crayon to a square piece of scrapbook paper with a glue dot and than layered that onto a larger postcard size piece of scrapbook paper. Then I stamped the sayings I wanted as well as my son's name to personalize it. You can also have your child decorate the postcard paper by drawing or coloring on it before you stamp out your sayings. You can find more sayings here (as well as more printables!).

The possiblilties and variations really are endless with this craft. And the kids have a great time helping you make them too. Much more personal then a store-bought valentine and twice as cute!


Tree Cupcake Topper {101 Woonedeeen DIY Tutorial}


 Now that we're in the full swing of the holiday season we thought we could share a few fun DIY tutorials and patterns that go great with the holiday season. This tutorial was originally on 101 Woonedeeen however the link that each blog gave to the original post lead us to a 404 error. So we finally found the link to the PDF template (below) and were able to try it out ourselves. And fair warning - it is in a different language.

Simply cut out the strips of paper from the template and weave them onto a skewer stick. Then use the skewer part of the stick to add them to the tops of your muffins, cupcakes or other fun treats!


To download the PDF template go here. Or use scraps of paper you have left over from your latest project to create your own design! Instead of an apple, top with a star for the perfect Christmas tree design.

Kid-Friendly Stamped Cards {Maureen Cracknell Handmade DIY Tutorial}

Source

When I stumbled upon the pictures for these adorable rose cards on Maureen Cracknell Handmade's blog I knew we had to try them out. They were beautiful and unique. Plus they used up the end of a vegetable that I might have just thrown away when I was done using it. This tutorial is simple, easy and almost not needed. Just look at the pictures to get an idea of what you're supposed to do.

You can also get creative! Try playing with colors or painting each celery stalk a different color to make a rainbow rose. Or add a rose garden onto canvas. I've also read that you can do this with lettuce as well. Maybe have a whole flower scape with different vegetable stamps.

What You'll Need:
  • Celery bunches
  • Paint
  • Glitter
  • Cardstock
Source
1. Cut the celery leaving only about 2 inches of in tact stalks.

2. Pour paint onto a small dish or paper plate.

3. Press the celery (cut side) into the paint and then stamp on paper.

4. Sprinkle with glitter while still wet.

5. Add a leaf or two if you'd like and personalize the card.

Source

Bubble Mailers {27 Things DIY Tutorial}

Any time we can use up left over paper and cardstock in a project that will be used frequently we get giddy and excited! So when we saw this tutorial over on the Shoplet.com blog (originally from 27 Things) for a bubble mailer we knew we wanted to share it. We are always shipping things and when it comes to packaging sometimes pretty isn't an option. Being able to use our paper scraps we can customize the look of our mailers to fit the needs of what we'll be mailing.

Source: 27 Things

The tutorial below is to make a 6x9 mailer but as she says in her original post, you can make the mailers to any size you prefer. We can't wait to get started! For more pictures as you move along check out 27 Things' awesome step-by-step pictures.

What You'll Need:
  • cardstock (one 7.5″ x 10.75″ sheet)
  • pretty paper (one 7.5″ x 10.75″ sheets)
  • rubber cement
  • bubble wrap (two 6″ x 9″ pieces)
  • art knife (X-Acto knif)
  • cutting mat
  • scissors
  • ruler
  • a scoring tool or an old ballpoint pen that is out of ink
Getting Started
Start by trimming everything to size. This includes your card stock, paper and bubble wrap.

The bubble wrap should be trimmed to the inside dimension of your mailer, in this case 6″ x 9″. The card stock will be cut to finished size of your mailer, including a 1″ flap, in this case 7.5″ x 10.75″. Your paper should be cut slightly larger than the finished mailer on the 3 sides that will be adhered to the card stock.

I like to allow for a decent seam around the edges and bottom of my mailers. A larger seams means that your mailer will be less likely to pop open when you fill it and/or during transport.

A note on rubber cement -
Rubber cement is great in that it can be used for 2 types of adhesion: temporary and permanent. The best result for mailers is achieved using a cured bond. This means you apply the rubber cement to both surfaces and allow it to dry before joining.

1. Have your bubble wrap ready to the side of your work area.

2. Lay your card stock and patterned paper side by side and face down on your work area.

3. Line up the bottom edges of your sheets.

4. Apply a 2″ border around all 4 edges of your patterned paper, starting at the bottom, then the sides, saving the top edge for last.

5. Place one piece of bubble wrap, bubble side down and smooth side up, onto the wet sheet. Be sure make the top edge of the bubble wrap line up flush with the top edge of the paper.

6. Using your patterned paper as a guide, apply a 2″ border of rubber cement along the bottom edge and sides of your card stock. You don’t want to apply any glue in the area that will later be used as your flap. Apply a line of rubber cement across the top edge of your GLUED AREA and place the 2nd sheet of bubble wrap flush with this line.

Time for a break.
Take a breather and let the rubber cement dry completely.

Joining
1. Begin by making 2 small angled cuts on the bottom edge of the patterned paper. Cut from 1/4″ from the corner of the paper over the the corner of the bubble wrap, stopping slightly shy of the bubble. Repeat on the opposite corner. This will prevent the paper from buckling along the bottom edge.

2. lay the card stock bubble up and then gently lay the paper bubble down on top of it.

3. without applying any pressure to the glued edges, carefully line up the four corners of the bubble wrap.

4. Holding the sheets in place with your palms, use both pointer fingers to press the center of one edge of the paper onto the card stock edge. Join the rest of the edge by pressing down both fingers and moving them away from each other toward the corners.

Be sure that you don’t accidentally press down the corners of the bottom flap. You can use your scissors as a temporary barrier until you get the hang of it.

5. Repeat on the opposite side.

6. Repeat the above step on the bottom edge. Be sure to start in the middle!

Finishing up
Your mailer is almost done! Time to trim, burnish, score and fold!

1. Your edges will likely be crooked or have card stock or paper hanging over the edge. Trim the sides and bottoms to obtain an even edge of paper and card stock.

2. Use a ruler and a scoring tool (or inkless pen) to score a line along the flap about 1/8″ away from the opening of the mailer. This will make a nice clean fold.

3. Cut off the corners of the flap.

4. Using the rounded end of your art knife or pen, carefully rub along the 3 seams of the envelope. Gently run your tool along the edge of the bubble wrap to ensure all the paper is joined.

Enjoy!
Guess what? Your mailer is ready for mailing! I used strong double-sided tape to seal my flaps, but they can also be taped closed from the outside. Time to get mailing!

Post Your Pictures
Feel to post pictures of mailers you have created or received in 27 Things' Secret Mailers Flickr Group!

A Note from 27 Things:
Of course, it is my pleasure to share the mysterious process involved in making my top secret mailers. In return, I ask that you do not reproduce my mailers for resale and that you enjoy using them for your business or personal mailing. Should you decide that my mailers are beyond the scope of your abilities but you'd still like to have some, they are available in small sets on Etsy. Happy crafting!

Glow Jars {Intimate Weddings DIY Tutorial}

Aren’t these glow jars sublime? We found the tutorial over on Intimate Weddings. They take about two minutes to make and cost only 20 cents a piece. How’s that for an enticing DIY project? These would look amazing at an evening outdoor wedding. Line walkways with them, or place them on tables. Or you could easily use them as decorations for Halloween. Line the pathway to your home for an eerily beautiful look.

You could also use glow-in-the-dark paints to make the glowing effect last a bit longer. Or different shaped glass jars to change things up. All in all this is a very simple DIY project that most any adult could do. And the results are fantastic! Sure to impress any guests and leave them wondering how you did it. 

Make sure to check out Intimate Wedding's DIY Wedding section on their website. They have some great ideas on ways for you to add those personal touches to your special day. 


DIY Glow Jars Tutorial

For each glow jar you will need:
  • a jar
  • two Glow Sticks (check out your local 99 cent store)
  • scissors
  • rubber gloves
  • safety glasses
Disclaimer: This is a project meant to be done by an adult – not a child!

Purchase Glow Sticks and dig a jar out of your cupboard.


Grab two glow sticks and cut at one end. Make sure they are inside the jar when you cut them. I used rubber gloves because I didn’t want to get the glowing liquid on my hands.


Shake each glow stick while holding inside jar until contents are empty. You will notice little pieces of what looks like plastic along with the liquid. One reader said this is actually glass, so be careful. You will dump these out later.


Head to your garbage and dump out the little pieces of plastic. Swirl liquid around the jar.

That’s it. You’re done! Go and find a dark place and enjoy the glow! (Note: These will glow for about an hour.)


DIY Paper Flowers {Scrapbooks Etc DIY Tutorial}

Source

When you're a stationery designer (or if you work for one) there's one thing that you always have an overabundance of... paper! We are always looking for ways to use up the paper scraps that we have left over from projects, orders and samples we create. So when we stumbled upon this beautiful picture from Scrapbooks Etc on Pinterest we knew we had to try some out on our own.We'll be showing off the results in early December with a few other DIY projects we've been working on. Stay tuned!

Here are the directions we went off of from the Scrapbooks Etc post:

Scalloped Puffs
  1. Punch five scalloped circles from cardstock.
  2. Soak the circles in water for a few minutes.
  3. Remove the scalloped circles from the bowl and blot the excess water with a paper towel.
  4. Stack the five scalloped circles and stick a brad through the center.
  5. Beginning with the top layer, scrunch all the sides up together. Repeat with each layer until the flower is formed. Let it dry completely.
Fringed Flowers
  1. Cut a long strip of cardstock, and fringe-cut 2/3 of one side.
  2. Gently fold down the first few fringed pieces on one end and begin rolling strip with these folds inside.
  3. Once rolled, gently fold back all remaining fringes outward and add an adhesive dot at the end of the strip to secure.
Spiral Flowers
  1. With a pencil, lightly draw a 4″ circle and a spiral from the outside to the center of the circle. (Increase or decrease the size of the circle to change the size of the resulting flower.)
  2. Cut out the spiral using decorative-edge scissors. Be sure the decorative edge faces the outside of the circle.
  3. Bend the tips of the decorative-edge down and roll into a spiral, beginning at the outer end of the spiral. Be sure to bend the tips toward the side with pencil marks (so they will be hidden on the back of the flower). Let the flower relax and adhere at the center/end of the spiral to secure.


Fabric Poms {Once Wed DIY Tutorial}


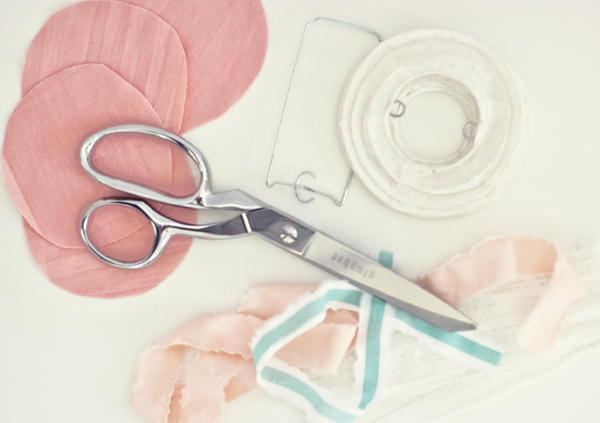
When we stumbled upon this DIY tutorial from Once Wed we knew that we had to share it with our readers! This project is simple, versatile and gorgeous. Some have mentioned that they have had luck using styrofoam balls and pins instead of the lantern and glue gun so it's really up to you to choose what method you best like for the project.

I plan on using these to decorate the house for an upcoming party I'm hosting in the colors of the party. I think that these will give that little pop of color that I need without breaking the bank! These poms are the perfect substitution for pew bows or hanging flower balls for the flower girls at a wedding, hanging decorations at a shower or party and much more. Thanks, Ashley! We love it.

Fabric Poms

Supplies 
  • fabric
  • scissors
  • hot glue gun
  • chinese lanterns
 
Step 1: Cut circles out of fabric.

Step 2: Fold the circle in half and put a little hot glue on the center, then fold over to secure.


Step 3: Apply more hot glue to the bottom of the folded circle.

Step 4: Press the bottom of the folded circle with the hot glue onto the chinese lantern.


Step 5: Repeat these steps until the whole lantern is covered. Once finished, attached some fabric to the metal frame of the lantern to hang.


Pirate Booty Popcorn Holders {DIY Party Stationery and Decor}

For our super cool pirate's booty holders we used a simple DIY tutorial from Hostess with the Mostess. Instead of using gift wrap we customized the popcorn holders to match the theme of the party and add the birthday girl's name and age. These were fun and easy to make and the kids loved them. Even the adults were talking about how cute and practical they were. 

These customizable cones are the perfect addition to any party and the best part is that after the first set of cones are gone you just need to pop a few more cones on the sticks to refill the tray. Convenient and cute! If you would like Cherish Paperie to customize some popcorn cones for your next event contact us today!

You’ll Need:
  • gift wrap, decorative or customized paper
  • lollipop sticks or small wooden dowels (we used small wooden skewers from Smart&Final - meant for corn on the cob)
  • craft styrofoam sheets – approx 1″ thick
  • shallow tray or vase/container (we used a photo box from Michaels)
  • candy/treats for the cones
  • candy/treats to cover the styrofoam
  • tape, glue stick & scissors
Directions

For the Paper Cones:
  1. Download or create a template for the cones. (You can download the one we used here. It makes 5″ cones.)
  2. Trace the cone template onto the paper, then trim out. Repeat as many times as you need.
  3. Roll the trimmed paper into a cone shape, making sure there’s enough of a hole left in the bottom of the cone for the lollipop stick. Secure the cone shape with a piece of tape on the inside, and use the glue stick to make the outer edge lie flat.
For the Party Display:
  1. Cut a piece of the styrofoam sheet to fit securely within your tray or vase/container.
  2. Place the styrofoam in the container, then insert the lollipop sticks into the foam, leaving a few inches in between the sticks to make room for the cones. (You can insert the sticks in neat rows or in a random configuration – whichever you prefer!)
  3. Pour candy or popcorn on top of the styrofoam until it is completely covered (we used Good & Plenty's)
  4. Fill each paper cone with candy, popcorn, or another treat, then slide them onto the lollipop sticks.

Paper Layering Tool {DIY Tutorial}

We recently ran across a genius DIY idea to make perfectly positioned layers on your invitations and DIY paper projects over at Project Wedding from a post in their forums. The poster's idea stemmed from a product that Envelopments carries called the JIGster. And since the JIGster costs upwards of $70 it just isn't in the budget for some DIY brides.

The end product creates the perfect template to use in layering paper on top of one another giving a clean, even look every time! I might just use this on my holiday cards this year to position my family pictures! The directions to make your own are below:

Hi All Last week photo 2551250-3
Source
Directions

  • Go to your local craft store and look in their pre-cut picture mat section. Just buy the cheapest one (Michaels had a 5x7 that was already layered at a 1/4" - it was $1.80).
  • Pick up some foam board (or anything that is sturdy). I picked up a small piece for $0.99 which I cut to make two 5x7 rectangles.
  • Using an x-acto knife make a clean slice in two opposite corners.
  • Using a hot glue gun (or any craft glue) and glue the 1st piece of mat on to the background board*
  • Measure where you want the 2nd mat to hit... since mine was already at 1/4", I didn't need to do much. If you wanted an 1/8" or three levels you'll just need to measure where the steps should go and layer appropriately.
  • Glue the 2nd mat on top of the 1st mat.
  • Let it dry and you are good to go. Perfect edges without driving yourself mad!
Hi All Last week photo 2551250-4
Source

*The poster's only note is to glue close to the edges on the first mat. The paper that she printed on was thinner and had the potential to slip under the mat.

Do you have a DIY project you'd like to share with us? We'd love to post it on our blog! Contact us at danielle@cherishpaperie.com with your information.

Scratch-Off Save-the-Dates {DIY Tutorial}

Brides are always looking for a fun and unique way to set their stationery apart from others out there. Well we just ran into a great idea for a DIY save-the-date card over at Martha Stewart Weddings. It's not only cute but interactive as well! Guests are sure to clear their calendar for your special day with this original card.

Tools and Supplies
  • Ink-jet and laser printer
  • 8 1/2-by-11-inch card stock in white or cream (you will print 2 cards per sheet)
  • Craft knife and metal ruler
  • Metallic acrylic paint (we used Golden Artist Colors acrylic paint in iridescent silver, $4.75, utrechtart.com)
  • Liquid dish soap
  • 1/4-inch-wide watercolor brush
  • A7 envelopes (5 1/4 by 7 1/4 inches)
  • Pennies

Basic How-To
  1. Download Martha's PDF file, and open it using Adobe Acrobat Reader (if you are using a Mac, use Reader instead of Apple's Preview application). 
  2. Replace the placeholder text with your own (you only need to do this in one box; the form will automatically fill in the rest), and print onto card stock.
  3. Use the craft knife and metal ruler to cut between the crop marks (do not cut all the way to the edges of the paper; this will leave the crop marks intact around all the edges to guide subsequent cuts).
  4. Combine one part dish soap with two parts metallic acrylic paint. Paint neatly over the number in the center of the hearts with a thin layer. Let it dry thoroughly, about 1 hour, and then add a second layer. Let second coat dry thoroughly (about 1 more hour) before putting the cards in the envelopes.
  5. Mail the card with a "lucky" penny for scratching (you will need extra postage for this).
Remember to weigh your save-the-dates just as you would your invitations to insure that each and every one arrives at its destination.

    LinkWithin

    Related Posts Plugin for WordPress, Blogger...